By Trestkon
Date Created: 8/5/2005
3ds2de
Deus Ex Animated Model Importing:
In this tutorial I will not try to teach you how to model nor will I try to teach you how to animate, there are many tutorials out there for that.
This is a tutorial for working in 3d Studio Max, however the part about 3ds2de can be applied to a model exported from any application to the 3ds format.
Near the end of the tutorial I will explain how to use the new 3ds2de, which Jim has coded for us modelers.
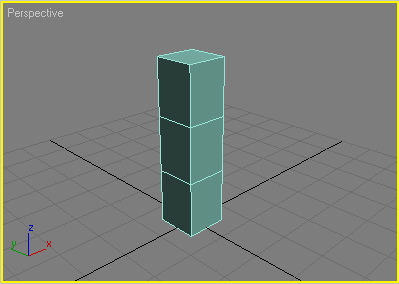
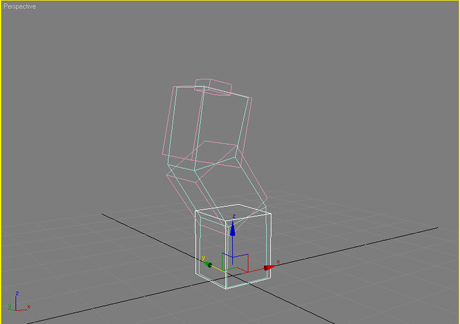
I will be using a tall rectangle with 3 sections for an example model.
In my original tutorial I used basic bones but now I use "Physique" this is part of the character studio package. There are a few other modifiers that do the same job as well as basic bones, I personally find physique easier.
To make things A LOT easier later I like to make the model one complete mesh.
How to rig the model:
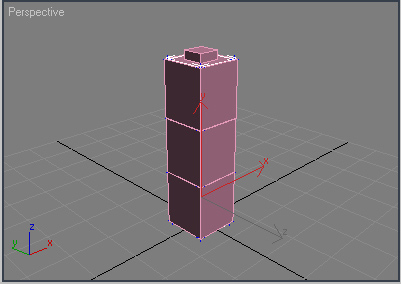
First you need to make your skeleton. This is made up of simple boxes. It is VERY important you have the pivot point of the bone where you would like the mesh to bend. In the example all the bones have the pivot point where the intersections of the box starts.
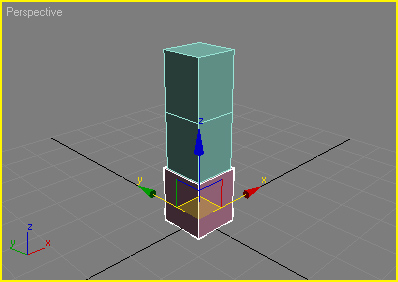
What you call the boxes (bones) is up to you, I called mine bone1, bone2 etc.
Finally you need a nub on the end, otherwise you wont be able to attach points to the last bone.
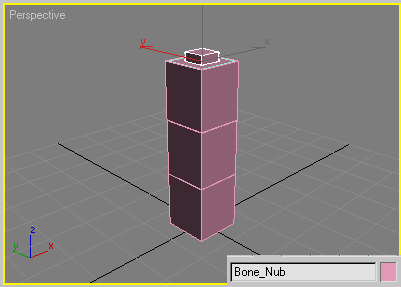
Right, now you have your skeleton you now need to link the bones together. Use  this button to link the bone in descending order, so the nub should be linked to bone3, bone3 should be linked to bone2 etc. Click on the bone then hold the mouse button down and drag to the next bone. this button to link the bone in descending order, so the nub should be linked to bone3, bone3 should be linked to bone2 etc. Click on the bone then hold the mouse button down and drag to the next bone.
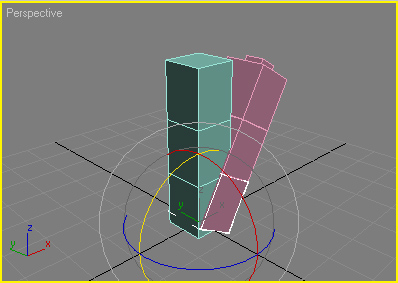
Now if you move or rotate the first bone the other bones should follow.
Its time to link the mesh to the bones so apply the physique modifier to the mesh. Click on the attach to node button  and select the first bone. and select the first bone.
A dialog should appear; at this point I would advise looking for a tutorial on how to set this up. I use Rigid and set the Bending between links pull down menu to 3 links I do this as that is how I leant to do it for Unreal Tournament 2003 models and I feel most comfortable with it this way.
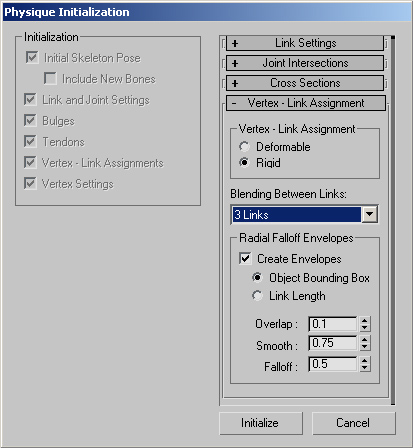
Everything else I leave to default. Now its time to hit Initialize.
I can pretty much guaranty the model will NOT be rigged properly so you will have to set the links up yourself. I remove all the linked points for ease. So in the vertex sub section of the modifier click on select and select all the points.
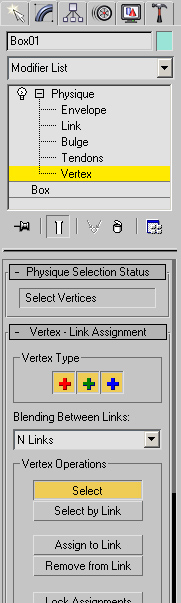
Now click on the remove from link button and make sure the blue cross above is selected and then drag a box over the whole model so all the points are blue.
Now its time to relink them to how you want. Its best to have the blue cross selected when selecting as this will ensure you will only select the blue points and none of the linked points.
The links are represented by yellow lines. So once you have the points selected make sure the green cross is selected and then Assign to link I want the first 8 points to be linked with the first bone so I assign the points to the bottom yellow link which will turn red when it's been selected.
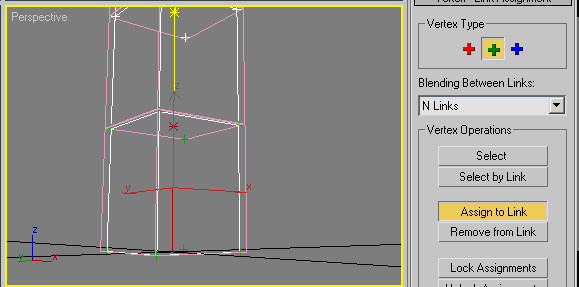
It depends on how you want your model to bend but you can overlap linked points by assigning points to more than one link, this may help when bending. If a point is linked to more than one link they will turn a darker green. Making the points red has pretty much the same effect however it can also cause some problems so be careful.
Once you have assigned all the points to the right links your model should move how you want it.
Now you have a rigged model YAY!
keyframe your model by moving the bones to how you want them and setting the keys. Its easier to write the frame numbers of your sequences down while animating otherwise you will have to go back. You can also use separate files for each sequence, which ever you find easier.
Also remember you can use other modifiers that can help animate the mesh to how you would like. Even cloth or physics simulation can be used since the final mesh will be baked as described in the snapshot section below.
Once you have a fully animated model you are ready for the next step. If you only have one mesh, this bit will be easy. First name your model, I shall call mine box its important you dont put any numbers after the name as the next part will do that for you.
Snapshot:
Make sure your mesh is selected only the mesh not the bones, then select the snapshot tool in the tools menu on the menu bar at the top.
In the to: part put the ending frame number and in the copies: part put the end frame number and add one more. So if the end frame is 20 put 21 in the copies part.
Now click ok.
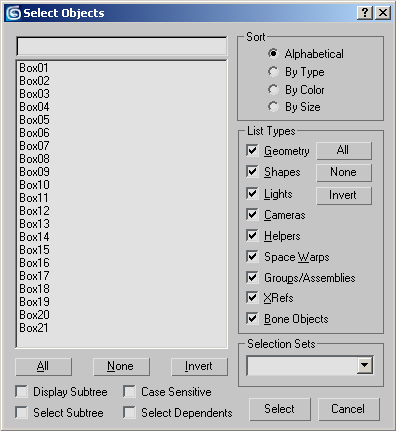
Max should go through the process of making a mesh for each frame. In the end you should have 21 models in the scene numbered from 01 to 21. Delete the original model and the bones so you are left with the numbered models. This is why you should use only one mesh otherwise you will have two or more sets of meshes that will need to be attached.
Now believe it or not, your model is ready for exporting.
Importing into Deus Ex:
Make a directory in your Deusex directory. Call it the name of the package you've made this model for; I will use Mypackage as an example.
Now, your model is ready for importing. Export your model as a .3ds file "File-->Export" (make sure the "preserve textures" box is checked)
Now save your .3ds file into the directory you've just made. To actually convert the .3ds file into a file that works with Deusex, you will need the new 3ds2de kindly coded by Jim and Steve Tack... And Legend Entertainment Co.
NEW 3ds2de TOOL STUFF
The New 3ds2de explained:
Jim has very kindly coded a fixed version of 3ds2de. Before you could not have the same effect twice so if you wanted to have two separate textures as translucent you couldnt but now you can have all the textures translucent if you wish... However if you did want that, there are easier ways heh. Also there seemed to be problems with having more than one effect on the same texture. For instance the muzzle flashes on weapons are Translucent AND unlit, this was not possible with the old 3ds2de but now you can do that and a few other things.
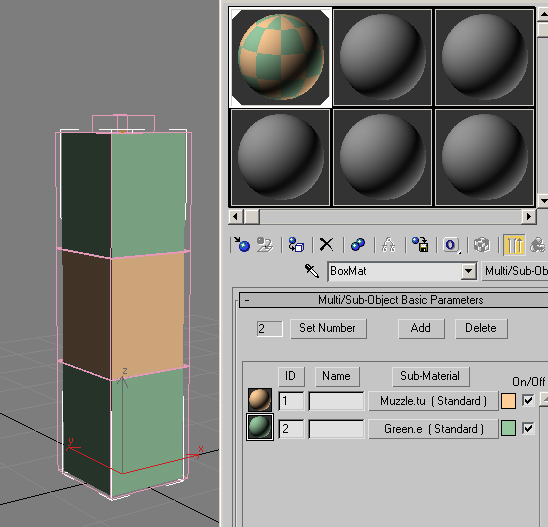
All the information you need is in the readme but lets take the muzzle flash of a weapon as an example. The muzzle flash part of the mesh should be a different material ID and have a separate texture to the rest of the model. You need to name this texture with the extension .tu so the name should look something like Muzzle.tu you dont have to name it muzzle of course it can be anything you like but you must have the .tu at the end to make sure it is both unlit and translucent.
In the image below I have a second texture called Green.e, the ".e" this means the texture will be enviromapped, like the front window on Jocks Helicopter.
Extract the zip into your package directory.
Although I will show how to use it, make sure you read the instructions Steve has given. To make life easier, I like to make a .bat file. If you are unsure how to do this, make a new txt file by right clicking on the empty space inside your directory, then choose new then "Text document". A file called "New Text Document.txt" should be created, simply rename this to convert.bat or something similar. Now right click on convert.bat and choose "Edit", Notepad should load up.
Now paste these lines into notepad.
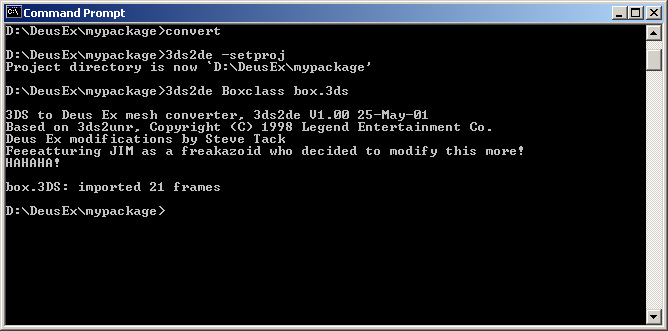
3ds2de -setproj
3ds2de ModelName model.3ds
Replace modelname with the name you want for your class file and replace model.3ds with the name of your .3ds file.
Double click on convert.bat, a "Browse for Folder" dialog should pop up, use this to find the directory you created (for example c:\Deusex\Mypackage), then click "ok". You should now have something like this, in a Dos window.
If you have any errors, something has gone wrong, the instructions for 3ds2de outline some errors you can get, make sure you check that so you know what to fix.
Importing into Deus Ex Continued:
In your package directory, you should have two more directories "Classes" and "Models".
Look in the classes folder, you should see a (modelname).uc file, I like to use wotgreal (http://www.wotgreal.com) to edit these files, but you can use notepad or other text editors. Now, if you remembered to note down your sequence frames you'll be ok, just type them in (you can use the class files from Deusex for reference) If you didn't write them down, you'll have to work it all out from your model in 3dsMax.
I won't explain any further since it's more of a coding issue. One thing I will say though... Sometimes the model will need repositioning; you may need to change this line to make sure your model is in the right place.
#exec mesh ORIGIN MESH=WeaponStaff X=0 Y=0 Z=0 YAW=0 PITCH=0 ROLL=0
You'll have to work in thousands; Z is up and down, put -1000 to move it down a notch or 1000 to move it up.
(DO NOT change the scale, if the model is too big or too small use "drawscale=" in the Default properties section)
If you have anymore questions or comments about this tutorial email me at phasmatis81 (at) hotmail.com
|