Using Deus Ex Skies
Introduction
Up until FAKK2's release in 2000, the Unreal engine has had the most powerful skybox technology of any engine in existence. The ability to place geometry in a separate area, texture and light it, and then project it onto your sky surfaces allows for extremely realistic, detailed, and awe inspiring graphics. This tutorial is not going to get in-depth about all the different things that can be done with this technology. Rather, we'll explain the basics of implementation and then leave the rest up to you.
The Concept
The basic idea behind making skies is this: you create a separate space (not connected to your game play area at all), place lights and textures and geometry in order to create the look you're going for, and then drop in an actor that will reflect your skybox images onto whichever surfaces in your actual gameplay area have been designated as skies.
Prep the Play Area
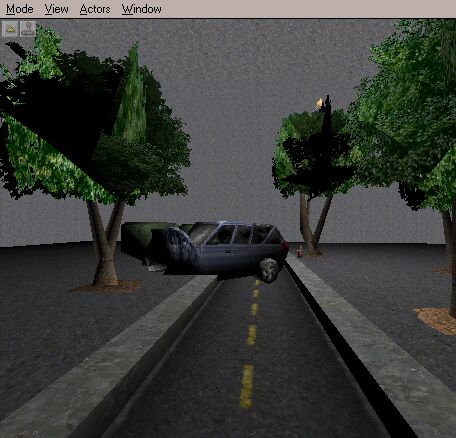
First, create your actual gameplay area (the part of the game world where the player will be).
Then identify which surfaces you want to look like skies. Select these surfaces by left-clicking on them once, then right-click to bring up the Surface Properties dialogue box. Put a check in the 'Fake Backdrop' box, and your sky graphics will be 'projected' onto these surfaces sort of like a texture.
Create the Skybox
Now, before getting into the nuts and bolts, let's talk a little about what a skybox actually is. It's an enclosed area completely separated from the game world where you'll be making geometry, placing textures and lighting, and then putting a SkyZoneInfo actor in the center. What this actor does is work like a 'camera', so that when the player in the game area looks in a certain direction at the sky, it will be as if he was standing in the skybox on that SkyZoneInfo looking at that same direction. What he sees reflected onto the surfaces in the game world that have been tagged as 'Fake Backdrops' are the textures and the geometry that you placed in the skybox.
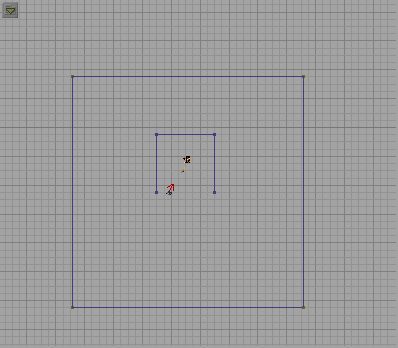
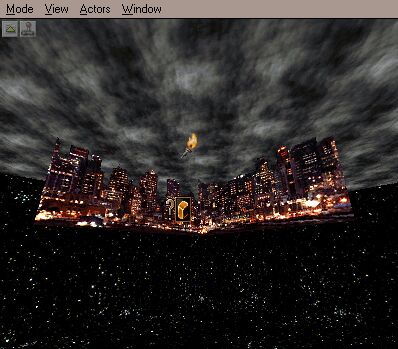
For this tutorial we're going to pick a cityscape shown against a starry nighttime backdrop, with a moving cloudbank overhead. The very first step is to pick a texture that will show up as the background of your sky. For this example, we'll use a starry night tex, so go to the CoreTexSky packaged and grab the ColorStars_A texture. Then carve out a space totally unconnected to the area where you'll actually be playing the game. I'd say start with a cube that's 1024wX1024lX512h. Anything smaller, and your textures will look too low-resolution.
Once that's done, we want to place the SkyZoneInfo actor into this skybox to use as a frame of reference. Go to Classes in the drop-down menu in the upper right hand corner, then expand INFO, expand ZONEINFO, and select SkyZoneInfo. Once this is done, plop it into the center of your skybox (hold down the 'A' key and left click).
Now we want to create the city backdrop with buildings on three sides. Open the Airfield.utx texture package, and in there you'll see AF_skybox1Mbs, AF_skybox2Mbs, and AF_skybox3Mbs. These are what we'll be using. Click the button for building a 2D sheet  , and since the AF tex are 256x128 make your sheet to match. Click the X-wall radio button so the sheet is vertical. Do this for the other two textures,and rotate them into place around the SkyZoneInfo actor as shown. , and since the AF tex are 256x128 make your sheet to match. Click the X-wall radio button so the sheet is vertical. Do this for the other two textures,and rotate them into place around the SkyZoneInfo actor as shown.
Now for the clouds. Get your texture from CoreTexSky.utx... I'm using ClenCloudBank_A here. Select the texture, and build a horizontal sheet (ie Floor/Cieling radion button) that is the same dimensions as the skybox (1024x1024). Place it so it's flat against the tops of the three planes that have the building textures. Now right-click on this new plane to bring up Surface Properties, and check the Translucent and V-pan options. This will make the clouds move in one direction, and you'll be able to see the stars through the clouds.
The last step will be to light your skybox. For beginning purposes, I'd just slap a single light in the box somewhere near the SkyZoneInfo (do this by holding down "L" and left clicking).
You're done, bro. Send this bad boy in as a resume builder.
|